
This article describes the procedure for defining and adding a new attribute to a Representative data.
Proceed as follows:
- Click on the attributes icon
 in the Representatives The Configure Representatives selection box is displayed. This screen enables defining attributes for all Representatives.
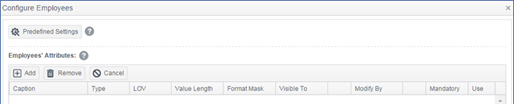
- Click on the Add button to open an attributes selection table.

- Select the Caption cell and type the name of the attribute; for example, e-mail.
- Select the Type cell and define the type of the attribute out of the menu: String, number…
- Click on the LOV (List of Values) check-box if you want to limit or strictly define the selection of this attribute. A values selection icon button
 is shown.
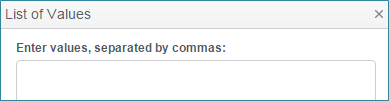
 - Click on the
 button and aList of Values box is shown. Type in the values separated by a comma; for example, male and female for Gender attribute.
- Click on the Value Length cell to limit the length of the value string
- Click on the Format Mask to require correct format of the attribute. A dropdown menu is shown: select None, E-mail or URL as format in accordance with the define attribute
- Click on Visible to cell to define the personnel that this attribute is shown to. If you select By role
 , click on the manager
  button to open a Choose roles
 - Click on the box to open dropdown selection, and click on a role for selection. Repeat procedure for the addition of another role.
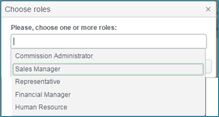
- Click on Modify by cell to enable personnel to modify this attribute. If you select By role , click on the manager button to open a Choose roles
- Click on the box to open dropdown selection, and click on a role for selection. Repeat procedure for the addition of another role.

- Click on the Mandatory checkbox to make this attribute mandatory in the Representatives page.
- Click on Use checkbox to display this attribute in the Representatives page. If this checkbox is not approved, this Attribute data is saved in the system but not displayed.
- Click Save to store the attribute definitions.
Comments